How to Measure for a VELUX Curb Mounted Skylight Replacement

How to Measure for a VELUX Curb Mounted Skylight Replacement

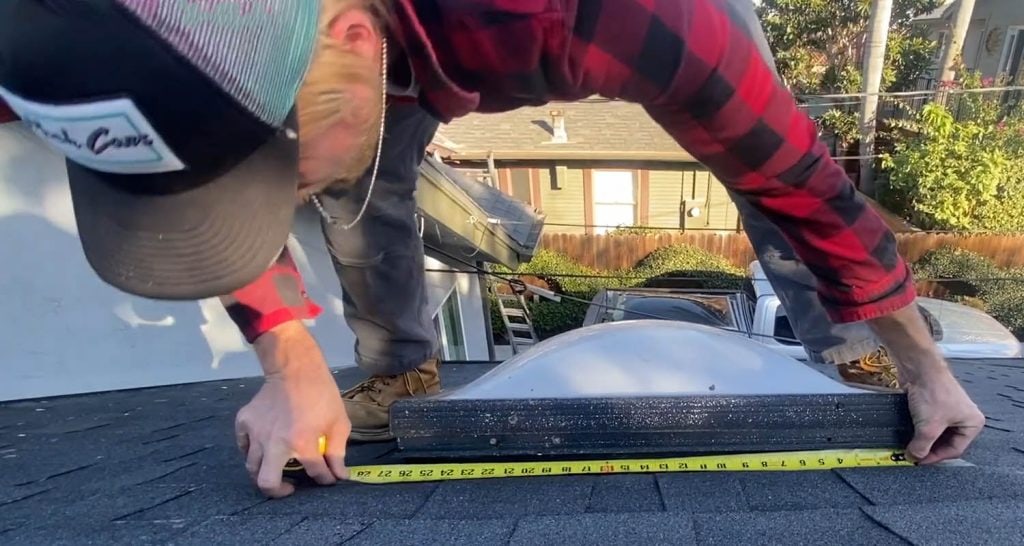
If you’re getting ready to replace an old skylight, taking the right measurements is the first and most important step. Ordering the wrong size can lead to leaks, air gaps, and installation headaches, so it’s worth taking a few extra minutes to measure correctly.

In this guide, Matt from Replacement Skylights walks you through how to measure for a VELUX curb mount skylight, explains what to look for, and shows you how to use the VELUX Skylight Size Chart to find the correct model for your roof.

Step 1: Identify Your Skylight Type

Before you pick up your tape measure, determine which kind of skylight you have. In the video, Matt demonstrates how to measure a curb mount skylight – the type that sits over top of a raised frame, or curb, built onto the roof.

This is different from a deck mount skylight, which attaches directly to the roof deck. If you see a framed “box” on the roof and the skylight is mounted over it, you have a curb mount unit.

VELUX makes both deck and curb mount skylights, but the measuring process is different for each. Getting this wrong can lead to ordering a skylight that simply won’t fit, so take a moment to verify your existing skylight type before you start measuring.

Step 2: Measure from the Outside of the Flashing

Once you know it’s a curb mount skylight, it’s time to measure. This step is where many homeowners go wrong. Do not measure the old skylight frame — that will not give you an accurate size.

The proper way to measure a curb mount skylight is to measure from the outside edge of the existing flashing, both width and length. These dimensions represent the outer size of your curb and determine which replacement model will fit correctly.

In the example shown in the video, the measurement is 26½ inches wide by 26½ inches long. Always list the width first, followed by the length (W x L).

A few tips:

  • Measure to the nearest ⅛ inch.
  • Double-check both directions to confirm the curb is square.
  • Write your numbers down immediately to avoid confusion later.

Even a small measurement error can throw off the fit of your skylight, so accuracy matters.

Step 3: Check the Height of Your Existing Curb

Next, you’ll need to measure the height of your curb. This ensures your new skylight will have enough clearance for proper installation and weatherproof flashing.

VELUX recommends a minimum curb height of 2 inches. Anything shorter can lead to drainage problems or make it difficult to install the new flashing kit.

In Matt’s example, the curb is 3½ inches high, which is perfect. If yours is too short, it’s easy to add an additional layer of wood to raise it to the correct height.

Pro Tip: Check your local building code – in some areas, minimum curb height may vary depending on roof pitch and material.

Step 4: Compare Your Measurements to the VELUX Size Chart

Once you have your curb measurements, the next step is matching them to the correct skylight size using the official VELUX Skylight Size Guide. The key measurement to look for is the Maximum Skylight Clearance.

This number tells you the largest curb dimension a skylight model can fit over. Your existing curb must be the same size or smaller than the maximum clearance listed. If your curb is too large, the skylight simply won’t fit. If it’s too small, the skylight won’t sit properly and won’t flash correctly.

Real Examples of How This Works

Let’s say you measure your curb and get:

  • 50 ½” x 50 ½” — This is perfect for any VELUX 4646 model (FCM, VCM, VCE, VCS).
    • The 4646’s maximum clearance is 50 ⅝” x 50 ⅝”, so your curb fits comfortably within that limit.

But if your curb measures:

  • 51″ x 51″ — This is too large for a 4646 skylight.
    • Even being ⅜” over the clearance prevents the skylight from sitting properly on the curb.

On the other end of the spectrum, the curb can also be too small:

  • 48″ x 48″ — This is too small for a standard 4646 model.
    • The skylight would not have proper bearing on the curb, and the flashing would not install correctly.

What if Your Curb Is Slightly Too Small?

If your curb is a little undersized, you don’t have to rebuild it – you can block it out.

For example:

  • Your curb measures 47″ x 47″ (just shy of what’s needed).
  • You can “wrap” the curb with standard 2x lumber (which has a 1½” nominal thickness).
  • Adding that all the way around increases your curb dimensions by 3 inches, giving you a 50″ x 50″ curb.
  • This now fits the 4646 model perfectly.

This is a simple, common solution and helps avoid costly curb reconstruction.

Custom Skylight Sizes

If your curb doesn’t match any standard VELUX size — or if you’re replacing a non-VELUX skylight with unusual dimensions – VELUX also offers custom-size skylights.

Here are the custom-size rules:

  • Smallest dimension: 18 ¾”
  • Largest dimension: 76 ½”
  • BUT both dimensions cannot exceed: 50 ¾” x 50 ¾” at the same time

So, for example:

  • A custom skylight 30″ x 70″? ✓ Yes, that’s allowed.
  • A custom skylight 60″ x 60″? ✗ Not possible — both dimensions exceed the 50 ¾” limit.

Important to Note About Custom Skylights

  • Custom skylights are fixed onlyno venting custom sizes are available.
  • Shades are now available for custom-size skylights, which was not the case historically.
  • Custom units typically take longer to manufacture and ship, so plan ahead if you need one.

Need Pricing on a Custom Size?

We’re happy to provide quotes or help verify your measurements:

📞 Call us: 1-800-900-0759
📧 Email: support@replacementskylights.com

Step 5: Choose Between Fixed and Venting Skylights

Once you know your skylight type and curb size, the next step is choosing between a fixed and a venting model. VELUX offers several options in both categories, available for curb mount and deck mount installations.

Fixed Skylights

A fixed skylight provides abundant natural light without introducing airflow. It’s ideal for spaces where ventilation isn’t needed—such as hallways, stairwells, closets, or any room that could use extra sunlight.

VELUX offers two main fixed skylight types:

Both are energy-efficient, low-profile, and built to last, providing bright, natural light and reliable weather protection.

Venting Skylights

A venting skylight opens to let in fresh air and release heat and humidity, making it a great choice for kitchens, bathrooms, or living areas.

VELUX venting skylights come in several configurations:

💡 Bonus Feature: All VELUX Solar Venting Skylights (VCS and VSS series) include a white, solar-powered, room-darkening shade and a remote control at no additional cost. This gives you effortless light and ventilation control with zero wiring required—making them one of the most energy-efficient skylight options available.

Step 6: Double-Check Before Ordering

Before you finalize your order, take one last look at your measurements and confirm your model using the VELUX size chart. This quick step ensures you’re choosing the exact skylight that will fit over your existing curb.

If you’re unsure or your curb dimensions don’t perfectly match one of the standard sizes, contact our team. We’re happy to help you verify your measurements or identify the right flashing kit for your setup.

Step 7: Order Your Skylight with Confidence

At Replacement Skylights, we make it simple to order genuine VELUX replacement skylights online. You’ll find every standard size, easy-to-follow installation resources, and free shipping to your home.

Whether you’re replacing a leaky skylight, upgrading to solar-powered ventilation, or simply refreshing your home’s natural light, we’re here to make the process easy. Our experts can also help you choose accessories like VELUX replacement flashing kits, shades, and mounting hardware to complete your installation.

Final Thoughts

Measuring for a replacement skylight doesn’t have to be complicated. By confirming your skylight type, measuring from the outside of the flashing, checking your curb height, and matching your numbers against VELUX Curb Mount Size Chart, you’ll know exactly which model will fit your home. Taking the time to measure correctly ensures a watertight seal, better energy efficiency, and a skylight that performs beautifully for years to come.

If you’re still unsure about your measurements, need help choosing between fixed and venting options, or want pricing for custom-size VELUX skylights, we’re here to help.

Whether you’re replacing a leaking unit, upgrading to solar venting, or exploring custom sizes, we’re just a call or email away.

📞 Phone: 1-800-900-0759
📧 Email: support@replacementskylights.com

You can also visit ReplacementSkylights.com to browse all standard sizes, compare models, and order online with free shipping. Let us help you get the right skylight the first time — brightening your home safely, efficiently, and effortlessly.

VELUX Solar Venting Skylight Unboxing & Installation (Model VCS 2222)

VELUX Solar Venting Skylight Unboxing & Installation (Model VCS 2222)

Unboxing the VELUX VCS 2222 Solar Venting Skylight

If you’ve been thinking about adding natural light and fresh air to your home, the VELUX VCS Solar Venting Skylight is one of the smartest upgrades you can make. In this video, Matt from Replacement Skylights demonstrates the unboxing and installation process for the VCS 2222 model – a 2′ x 2′ solar-powered skylight that installs on a curb and opens automatically using energy from the sun.

VELUX produces eight sizes of the VCS solar venting skylight, so it’s easy to find the right fit for your home. Each unit arrives safely boxed and ships directly to your door when ordered from ReplacementSkylights.com.

Every VCS skylight also includes a white, solar-powered, room-darkening shade operated by the same convenient remote that controls the venting function – letting you easily manage both light and airflow at the touch of a button.

What’s Inside the Box

Inside the packaging, you’ll find everything you need for installation:

  • The VELUX VCS skylight frame, finished in neutral gray (Kar 500)
  • The solar panel, which powers the venting motor
  • A removable screen, held in place by two quick-release pegs
  • The remote control (pre-paired at the factory)
  • Installation and programming instructions
  • A glass performance sticker, listing details like U-factor, solar heat gain coefficient, and visible light transmittance

The skylight’s electrical connection is simple – just loosen the two set screws on the motor housing, attach the solar panel plug, and tighten the screws back down. Once connected, the system powers up instantly.

Powering Up the Solar Panel and Remote

After connecting the solar panel, you’ll need to activate the skylight’s power switch. Look for a small red toggle inside the housing – flip it downward toward the center of the skylight to turn it on.

Next, remove the small red pull tab from the remote control to connect the battery. With that done, press the up arrow on the remote to test operation. The skylight should begin opening immediately, rising smoothly in about 45 seconds. The remote features only three buttons – Up, Down, and Stop – making it easy to control both ventilation and the room-darkening shade for customized comfort throughout the day.

Powering Up the Solar Panel and Remote on the VELUX VCS 2222

Replacing Old Skylights with the VCS 2222

In this demonstration, Matt replaces older acrylic dome skylights with new VELUX solar venting skylights. The old domes are lightweight plastic – not nearly as energy-efficient or durable as the new glass VELUX models.

After removing the old dome and checking curb measurements (in this case, 26″ x 26″), the new VCS skylight simply fits over the existing curb. Once aligned, it’s fastened in place using screws along each side of the aluminum frame. After all four sides are secured, the installation is complete and your home now benefits from natural daylight and automated ventilation powered entirely by solar energy.

Why Choose a VELUX Solar Venting Skylight?

VELUX has set the standard for skylight performance, and the VCS solar venting model continues that legacy with advanced design and sustainable technology. Key benefits include:

  • Solar-powered operation—no wiring required
  • Factory-paired remote control for simple open/close functionality
  • Built-in white, room-darkening shade powered by the sun
  • Energy-efficient glass with low U-factor and high visible light transmission
  • Pre-finished aluminum frame for lasting durability
  • Quiet, smooth venting for improved indoor air quality

Fast, direct shipping when ordered through ReplacementSkylights.com

Available Sizes and Options

The VELUX VCS Solar Venting Skylight comes in eight different sizes, designed to fit a variety of curb openings and roof types. Whether you’re upgrading a small hallway or a large kitchen, there’s a solar venting skylight to fit your space.

All VELUX solar skylights include:

  • Solar panel and motor assembly
  • White, solar-powered room-darkening shade
  • Pre-programmed remote
  • Removable insect screen
  • High-performance glass with protective coatings

Bring Natural Light and Fresh Air Into Your Home

Ready to upgrade to a solar-powered skylight? Visit ReplacementSkylights.com to order the VELUX VCS 2222 or explore other VELUX solar skylight models. Have questions? Call (866) 759-5660 for expert help choosing the right size and type for your home.